

Introduction
Jewelry molds allow you to bring any shape you can think of regarding jewelry. If it is a pendant that looks like your pet’s paw print or if you want to make 50 of the same pair of earrings for your business, molds allow you to do it.
This guide will discuss silicone, rubber, and metal molds to take your raw materials to finished jewelry for each stage. OOTB has created over 50,000 styles of jewelry using these same techniques, and we hope to pass this experience onto you.
Types of Molding Material
Silicone Molds

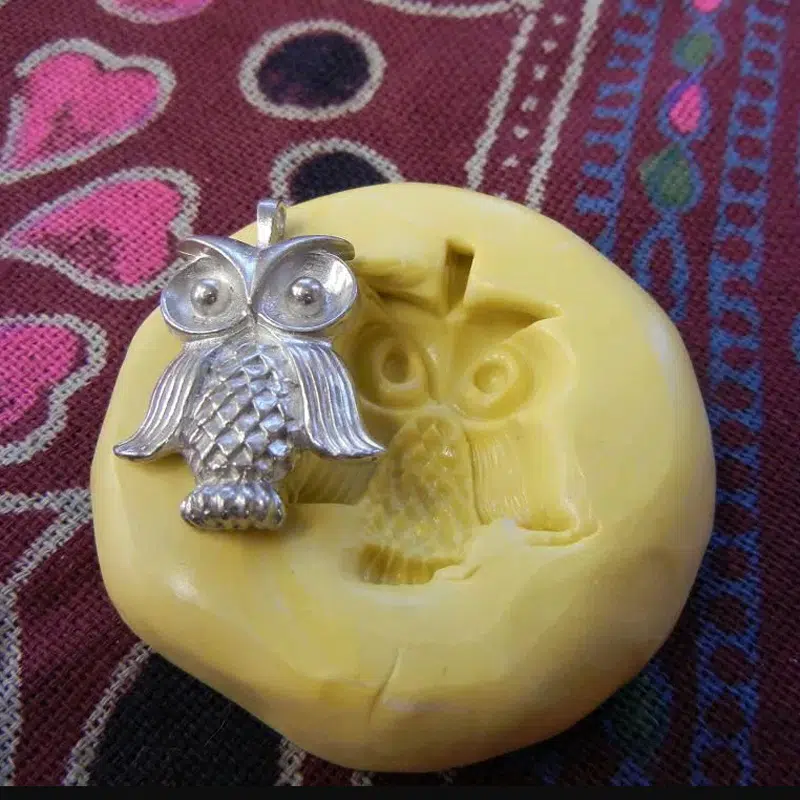
Silicone molds flex without breaking and peel away your finished jewelry like you’re taking off a glove. They can withstand temperatures up to 400°F, then continue to work perfectly fine after 500 uses or more.
Your jewelry comes out smooth and shiny surface that does not need to be polished–something plastic resin molds cannot do. The silicone captures every little detail from your original piece, including textures you can hardly see with your eyes. Most jewelers use silicone because it forgives mistakes, and works almost all casting materials.
Rubber Molds

Rubber molds can feel stiffer than silicone, they flex enough to take your jewelry out safely. They pick up super fine details that silicone may miss, making them ideal for designs with lots of tiny patterns or filigree work.
When wax or resin is injected into rubber molds, they do not compress or change shape, as a softer material might. The completed pieces come out with an unusually high polish and not as much polishing to do. Professional jewelers like to use rubber in making silver jewelry with intricate designs.
Metal Molds

Metal molds enable the creation of intricate shapes that would either cost a fortune or take too long to carve manually. You can pour hot metal through a hollow channel (called a sprue) directly into the mold cavity.
Metal molds work well with the lost wax casting process, a process that has been the standard for jewelry makers for thousands of years. Metal molds could last essentially forever if you treat them well, so using them makes sense for designs that you will be repeating many times.
Casting Materials
UV Resin
UV Resin will cure in approximately 3-5 minutes with a UV lamp. It will remain crystal clear unless color is added, and one bottle can make about 20-30 smaller pendants. The downside is that UV resin costs more than the alternatives and it will yellow if left in direct sunlight for extended periods of time (months).
Epoxy Resin
Epoxy Resin takes approximately 24 hours to cure, but does create jewelry that is really strong and doesn’t crack or chip easily. It is mixed with two liquid parts (the resin and hardener), and you have about 30 minutes to work with it before it starts to thicken. Epoxy works really well for embedding objects (ex. dried flowers or glitter).
Polymer Clay
With Polymer Clay, there’s no mixing, so you can simply pop it into a mold, then bake it in your oven at 275°F for 15 minutes.
Metal Clay
With Metal Clay, brass, silver, or copper is mixed with organic binders that burns away when fired. When it comes out of the kiln, you have solid metal (as you can probably guess, it’s much higher priced, but it results in a professional final product).
| Material | Cure Time | Cost per Piece | Best For |
| UV Resin | 3-5 minutes | $1-2 | Quick projects, clear pieces |
| Epoxy Resin | 24 hours | $0.50-1 | Strong jewelry, embeddings |
| Polymer Clay | 15 minutes | $0.25-0.50 | Beginners, colorful designs |
| Metal Clay | 2 hours | $5-10 | Professional metal jewelry |
A Step-by-Step Guide to Jewelry Making Process
Step 1: Creating Your Master Object
A master object is the original item you’ll reproduce with your mold. Start simple – use a button with a cool pattern, a shell from the beach, or shape your own design using polymer clay. The master needs to be completely smooth because everything, including bumps, scratches, and fingerprints, will show up on the mold. Clean off the oils and dirt with rubbing alcohol so that the mold material captures as much detail as possible.
Step 2: Making the Silicone Mold
Combine an equal amount of silicone putty Part A and Part B. Knead the putty together for 60 seconds until the color is uniform, and there are no streaks. Firmly press your master object into the silicone that you prepared, ensuring that air pockets are pushed out. Let it rest without moving for 20-30 minutes. The silicone should feel firm, but slightly bouncy when it is ready. Slowly pull your master object out – now, your mold is ready for hundreds of uses.
Step 3: Casting with Resin
Determine the amount of resin you need based on the instructions on the packaging (with UV resin, it is already mixed, with epoxy, you need to measure in exact ratios). You then add the liquid dyes one drop at a time until you obtain the color you want – remember, a little goes a long way. If you want these items to be integrated into the design, sprinkle in the glitter, tiny beads, or dried flowers. Pour slowly from approximately 2 inches above the mold, allowing the resin to flow into all of the little spaces. If any bubbles appear, pop them with a toothpick or lightly mist them with rubbing alcohol.
Step 4: Curing and Demolding
UV resin requires either 3-5 minutes under a UV lamp, or 15-20 minutes in direct sunlight. Epoxy resin must cure undisturbed for 24 hours at room temperature (the warmer the room, the faster it cures). To test your piece, poke the surface gently. It should feel completely hard with no sticky spots. Flex the mold slightly and push from underneath to pop your jewelry out. If it grabs, put the whole mold in the freezer for 10 minutes, which will cause the resin to contract a little.
Step 5: Finishing Touches
Start with sanding any rough edges with 400-grit sandpaper then 800-grit to smooth them down. Drill a small hole near the top with a diameter of a 1-2mm drill bit and go slow to avoid cracking. Remove the drill bit, and using small pliers, thread a jump ring through the hole. Make sure it’s completely closed. Now add your piece to the chain, and your custom jewelry is ready to go! If you’re using resin and want an extra shine on your piece, you can brush a thin coat of clear UV resin for another cure.
What You Need to Learn When Using Jewelry Mold
Quality of the Original Design
Your mold transfers everything, even errors. For example, a fingerprint on your master will be reflected in every cast. Again, sand and polish your master until you are happy before making the mold.
Choice of Mold Material
Silicone molds are useful for most projects, but if you are working with designs that have fine detail included, rubber molds are a better option. Metal molds only make sense if you are making the same design hundreds of times. Make sure your mold material matches the project expectations.
Maintenance of Molds
Wash molds with dish soap and warm water after five uses. Store them flat in a cool, dry location, away from direct sunlight. If they become sticky, dust them with powder.
Release Spray
Mold release spray can help stubborn pieces release easily. Just give them a light spray before use, especially with detailed designs. If you need something in a pinch, cooking spray works just fine, but specialized release spray works better.
Ventilation
If you inhale too much of the vapors created from resin, you might feel ill. To increase airflow in your workspace, open the windows and use a fan. Even “low odor” resins require good ventilation to be safe.
Conclusion
Jewelry mold allows any crafter to transform simple materials into fabulous jewelry pieces that look like they came from a professional. We recommend trying out the project with basic silicone molds and UV resin for all experience levels so you can build confidence before advancing to more complex designs.
When you are ready to scale your mockups or need custom jewelry manufacturing, OOTB has 10 years of experience to help you bring your jewelry creations to life at any scale.
FAQs
What type of casting is used for jewelry?
There are three main casting types used by jewelry makers – beginning with resin casting which is best suited for beginners and requires little equipment, lost wax casting for detailed metal pieces, or die casting if you need to produce your pieces in mass.
How does mold storage work?
It is advisable to store your jewelry rubber molds and silicone molds placed flat in a plastic container with a tight lid; at room temperature (65-75°F); with low humidity. You should place wax paper or other similar to separate your different mold materials to help avoid sticking together and/or chemical reaction.
What does shrinkage mean in jewelry making and how to deal with it?
Shrinkage occurs when your casting material gets smaller as it eventually cures or hardens, 1-3% for your resin and up to 10% for metal clay. You can make your original master slightly larger than your target size or use some of the mold making materials that have been designed to account for shrinkage.
Related Resources:
1. What is Jewelry Mold – Wikipedia
2. Metal Casting – Wikipedia

 English
  French
  Spanish
  German
  Russian
  Turkish
  Portuguese