Introduction
Learning how to solder metal together is important for jewelry making. This guide will talk about everything about how to solder silver, from what solder is and its melting point to silver solder types and their detailed steps. You’ll soon be able to join silver pieces yourself.
Meaning of Silver Soldering

Silver soldering means that you put silver solder between the gap of two pieces of silver, then use a blowtorch to heat it into liquid, and get a strong bond after it cools.
What Constitutes Silver Solder?
Silver solder is made from a unique mix of metals. It has silver, zinc, copper, and sometimes tin. The reason we mix other metals with silver is simple. Pure silver melts at 961°C, which is very hot and hard to work with. Adding copper and zinc lowers the melting point to around 655-780°C. This makes it much easier to use a regular jewelry torch.
Functions of other metals:
- Copper – Makes the solder flow better and adds strength
- Zinc – Helps the solder stick to other metals
- Tin – Sometimes added to make melting easier
Types of Silver Solder by Melting Point
According to the USGS report on page 10, silver-based filler metals typically used for soldering generally have flow temperatures in the ≈600-780 °C range.
Different types of silver solder melt at different temperatures. This lets you work on the same piece multiple times without melting your earlier work.
| Solder Type | Temperature Range | Silver % | Copper % | Zinc % | Tin % |
| Hard | 745-780°C | 75% | 22% | 3% | 0% |
| Medium | 720-765°C | 70% | 20% | 10% | 0% |
| Easy | 705-725°C | 65% | 20% | 15% | 0% |
| Extra Easy | 655-710°C | 56% | 22% | 17% | 5% |
Pro tip from my workshop: Always start with hard solder for your first joint. Then use medium for the second joint, and easy for the third. Follow these tips, and the earlier part will not melt or fall apart if you’re going to make a new joint.
I learned this the hard way when I was making a silver bracelet. I used easy solder first, then tried to add another piece with hard solder. The easy solder melted again and my bracelet fell apart!
Silver Solder Types
Pallion Chips
Pallion chips are little bits of solder alloy that have been cut. Their size is often in 1×1 or 1×0.5 millimeters. I often cut them even smaller for really tiny jobs. These little bits are great for delicate work, like adding small decorative pieces to a ring.
Wire
Solder wire looks like a thin piece of metal string. Solder wire allows you to cut just the amount you want. For me, what I usually do is take small pieces of solder wire and flatten them out with a hammer to make placement easier and for them to heat up faster. Solder wire is really great for making jump rings, or linking on chains.
Paste
A mixture of flux, binder, and powdered solder is called paste solder. It usually find it in a syringe or jar. Paste solder is great because it includes the flux so, you don’t have to add it separately, but it does have a shelf life—usually 1 to 2 years. When heated, paste solder can bubble and look porous after it flows. Paste is perfect for small attachments (ear posts, jump rings, and small additions on filigree pieces).
Sheet
For huge items like sculptures or vessels, sheet solder is perfect. It’s great when you need to solder two flat pieces together. Please take notice: too much creates lots of cleanup work. I suggest cutting thin strips from the sheet and placing them along the joint line.
Tools and Materials You Need
- Soldering Surface: You need a special surface that can handle a lot of heat to protect your workbench. This is usually a soldering block made of charcoal, ceramic, or honeycomb material.
- Soldering Pick: A thin metal tool for moving solder and silver pieces while they’re hot. You can buy one or make your own from a thin steel rod.
- Tweezers: Heat-resistant tweezers for holding small pieces. Get ones with smooth tips that won’t scratch your metal.
- Jewelry Torch and Butane: A small torch that runs on butane. This provides the heat you need to melt the solder. Most jewelry torches work perfectly for silver soldering.
- Solder: Start with one type – I recommend medium solder for beginners. You can always buy other types later.
- Flux: Flux is a type of liquid or paste; you can imagine it like buttering. The function is to make the silver solder move and flow smoothly after you apply flux on the surface.
- Crock-Pot: Fill it with a weak acid solution for cleaning after soldering. This removes flux residue and oxidation.
- Copper Tongs: Use copper tongs to pick up your silver pieces from the pickle solution. Do not use steel tongs, as they will react with the acid and mess up your silver.
- Quench Cup: A quench cup is a container of water. After heating your silver, you quickly dip it into the water to cool it down. This is called quenching. It also helps to remove some of the flux.
- Clean Rag: A clean rag is always handy for wiping down your tools and silver pieces.
Step-by-Step Silver Soldering Process
1. Clean Your Silver Pieces: First, you need to clean the silver pieces you want to connect. Sandpaper or a file can be used to lightly clean the areas of each piece that will come together for the joint.
2. Apply Flux: Next, it’s time to apply flux to the sections of silver, which part you’re going to solder. You can use a brush for this, and just a thin layer is needed.
3. Place the Solder: You will then want to take a very small piece of silver solder, and place that onto the joint of the two pieces of silver. You can use your soldering pick to aid you in this.
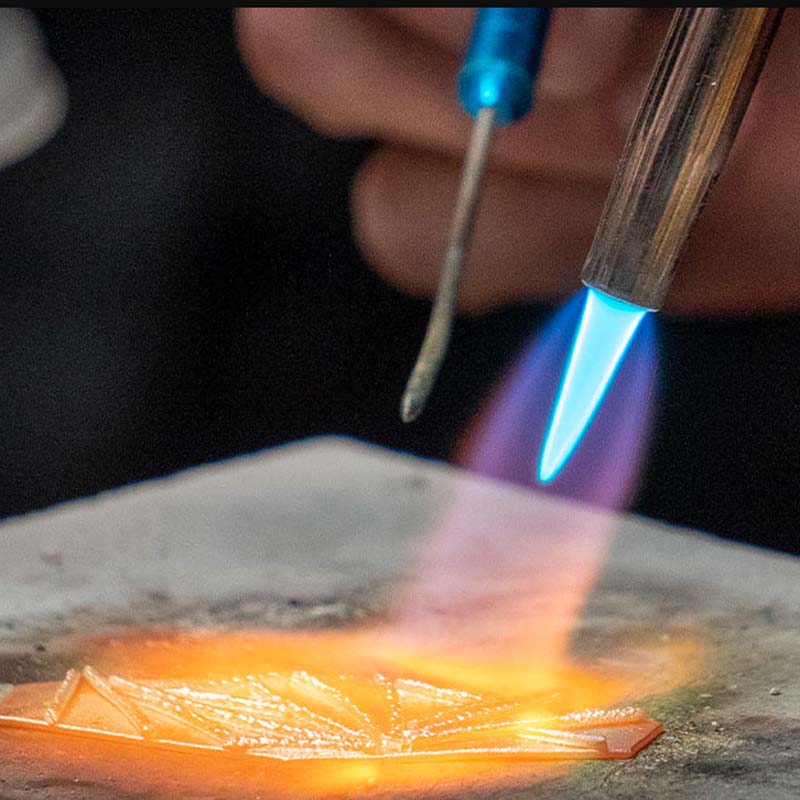
4. Heat the Silver: You will then heat your silver pieces with a jewelry torch. You want to circle the torch flame around on the silver pieces to heat the two pieces evenly. This is important, because you want the two pieces of silver to reach the proper connecting temperature, where soldering can take place. It is important that you don’t only heat the solder, but heat the silver around the joint.
5. Watch the Solder Flow: Once the silver reaches the proper hotness, the solder will become shiny and flat. It will “flow” into this joint and fill the space between the two pieces of silver. This will usually happen rather quickly. Once you see the solder flow you need to take the flame away quickly! If you are not careful and you overheat the silver mishaps can happen.
6. Quench the Silver: Using your copper tongs carefully pick the hot silver piece up and place it in the (water) quench cup to cool it.
7. Pickle the Silver: After quenching, put your silver piece into the warm pickle solution in your crockpot. Let it sit for a few minutes.
8. Rinse and Dry: Rinse your silver thoroughly under running water and dry it with a clean rag.
Beginner Troubleshooting Tips
1. Solder won’t flow
Once you meet this problem, consider these 3 main reasons first: heat is not enough for the joint, the metal is dirty, or the flux is burned off.
How to Solve:
First, try to clean the surface of the joint, then apply flux, then heat the metal until the silver reaches 655 to 780°C, according to the solder type you used.
2. Joint looks dull, porous, or grainy
If the joint looks dull, the main problem you should consider is overheating, which will burn the flux.
How to Solve:
You can file the joint back to smooth, and clean it thoroughly. Then apply new solder and flux for heating again.
3. Previous solder joints re-melt
This often happens if you use the same grade of solder, and you don’t step down the melting temperature.
How to Solve:
Try to start with hard, then medium, easy, and extra-easy solder. Control the temperature of each heating lower than the previous; this will help to solve the problem.
4. Pinkish copper layer on the silver
Due to 925 silver containing 7.5% copper, the copper will be diffused to the surface when heating. That’s why you will find the phenomenon.
How to Solve:
Try to pickle after soldering, as it can remove most copper oxides. If a deeper fire-stain layer is formed, you have to polish it with sandpaper.
Conclusion
Learning how to solder silver is an amazing skill to acquire! By this time, you’ve learned about the different types of silver solder, what they are made from, and the melting temperatures of each type of silver solder.
You have also learned about the tools you need, such as a jewelry torch, and how to solder metal together step by step. With additional practice, you should be able to create and repair lovely silver items successfully.
If you have any DIY tool material you need or want to customize jewelry, contact OOTB Jewelry.
Related Resources
1. How to Solder Silver Video for Beginner – Youtube


