Introduction
Leather and bead bracelets are made by combining leather cords and natural stones as wearable accessories suitable for casual use or special occasions. They are particularly popular as men’s accessories, do-it-yourself projects, and as personalized gifts.
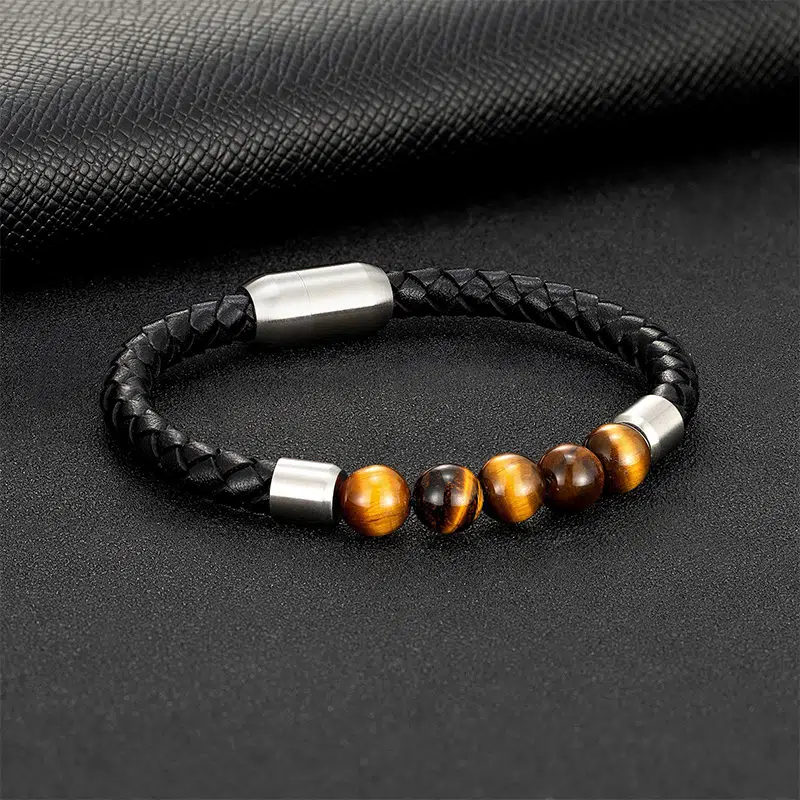
The two principal types of beaded bracelets are full-bead (in which the beads make a full circle) and half-bead (in which the beads are placed on one section only).
This guide will show you exactly how to make leather and bead bracelets, from measuring the wrist to applying the final clasp.
Materials You Will Need
Choosing the proper materials is more important than most people make it out to be. The most important area to consider is the clasp size. The standard sizes for magnetic clasps have an inner opening of 11.5 mm. If you have 6 mm wide leather, that leaves 5.5 mm of space. Leather is soft and compresses somewhat; thus, the 6mm leather will fit snugly and be secure after you glue. Using 8mm leather wouldn’t fit in the clasp. Using 4 mm, on the other hand, would allow it to easily slip out.
Leather Materials
Choose two different types of leather for this leather bracelet design.
- Braided leather cord: The width is 6 mm and the thickness is 3mm, giving you the proper size and texture.
- Flat leather straps: The same 6 mm width and 3 mm thickness give you continuity.
- Real leather vs. imitation leather: Real leather will last longer and develop a nice worn look as it ages. Imitation leather is inexpensive and fine for practice projects. Here is a guide to the kinds of leather out there, which explains the differences.
Beads
Natural stone beads work particularly well with leather due to the natural feel they convey.
Here are some things to look for:
- Stone types: Onyx creates a sleek black look, jasper adds nice brown tones, lava stone gives a beat, and tiger eye has a golden streak
- Size: Use a 6 mm bead. This corresponds with your 6 mm leather and looks well-proportioned.
- Color combinations: Earth tones (brown, black, and tan) are easily combined. Also consider an all-black look for something clean, or mix in one bright color with the other earth tones.
Hardware
- Magnetic stainless steel clasps: The standard hole size is 6 mm x 11.5 mm inside. Size is 13 mm x 20 mm. These clasps snap into place and stay closed during normal wear.
- Metal tube spacers: Required for half-bead styles. These connect the beads to short pieces of leather.
Look at leather magnetic bracelet options to see how the hardware looks in the finished bracelets.
Tools
- Scissors or leather cutting tools to create clean cuts
- Velvet measuring tape (the cloth type works better than metal)
- E6000 or glue made for leather
- Jewelry wire or elastic cord to string beads
- Lighter to seal cord ends and keep them from fraying
Measuring Your Wrist Correctly
You will need a soft tape measure around your arm where you want the bracelet to lie. Do not press it hard — it should comfortably fit against your skin. Note this figure down; you will need it for bracelet length. Also, in measured length, you will need to consider the clasp length. Also, all leather inserts will insert 5 mm into the clasp.
Men’s bracelets usually finish between 19 cm and 21 cm. Please check the bracelet size chart before cutting.
How to Make a Full-Bead Leather Bracelet

Prepare the Leather Strands
Cut your flat and plaited leather to the length you need. For a 20 cm finished bracelet, you want to cut each strand of leather to 19 cm long. . (Why? Each end 0.5cm will be inserted into the hole of the clasp, so there will be 18 cm left. With clasp 2cm long, your final bracelet will be 20 cm.
After cutting, apply a lighter to the ends, being careful to seal them quickly. Hold the flame to the cut edge for just one second – this melts the fibers slightly, thus preventing them from fraying.
Make the Full Bead Strand
For a 20 cm bracelet, cut 22 cm of wire. Slip on your beads onto the wire until the strand measures the desired length (ensure that the length of the beads is 19 cm). Tie the two ends of the wire together with 3 tight knots. Pull hard on the knots in order to test them. Trim off surplus wire and seal up this knot with a tiny drop of glue.
Assemble the Bracelet Layers
Organize your strands as follows: flat leather and braided leather cord at the left, and the bead strand at the right. Then, hold all the strands tightly together and try to put them in the opening of your clasp.
Attach the Magnetic Clasp
Squeeze a little glue into one end of the clasp tube. Don’t put too much in, or it will ooze when you push the strands in. Make sure all the strands are even at the ends. Push them straight into the glued end of the clasp. Don’t twist the strands as you put them in. Hold the clasp firmly for 30 seconds. Do the same for the other end of the clasp with the other ends of your strands. Let each side dry for 10 to 20 minutes before you wear them. For great strength, let them dry for 2 hours.
How to Make a Half-Bead Leather Bracelet

Prepare the Leather Strands
For a 21cm finished bracelet, you need four leather pieces:
- One flat leather strap: 20cm long
- One braided leather cord: 20cm long
- Two short braided leather cords: 8cm each
The math works like this: 8cm + 8cm = 6cm of leather on one side. That leaves 5cm for your bead section. 20 cm length of leather cord are used 1cm to insert into the clasp, and there’re 19cm with 2cm length, total 21cm.
Create the Half Bead Segment
Cut a piece of beading wire about 9 cm long. Thread your lava or other types of stones onto this shorter piece of wire, 5 cm in bead length. Add a metal tube separator to each side of the beaded area. These tubes will connect to your short pieces of leather. Tie a tight knot where the wire meets each tube. This knot will stop the beads from slipping off. This step is very important: Without this knot, when you wear the bracelet, your beads will slip off.
Install Beads with Short Braided Leather
Apply glue inside of both metallic tubes. Now insert a piece of 8cm braided leather cord into each of the tubes, inserting the leather at least 5mm deep. This will give you a bead segment with leather both sides. Leave to dry thoroughly, at least 20 minutes.
Install the Clasp
Now you have 3 parts, the long flat leather, the long braided leather, and the short leather piece which is the bead section. Take one clasp and put the long flat leather and long braided leather together as one part, and the short leather cords (the ones attached to the bead section) as another part, and put it in the clasp. Glue and hold straight. Allow to dry.
Conclusion
With both of these bracelet styles, you will achieve a different look to match your outfit or mood. Full-bead bracelets will make a more emphatic statement with stones all around the wrist. Half bead styles allow more of an accent without covering your wrist completely. Practice your gluing technique with less expensive materials.
OOTB produces leather braided bracelets and offers more than 500 unique types of leather bracelets to choose from. Contact OOTB for wholesale supplies, large orders, or custom-designed bracelets to fit your own specifications.


